
Concrete Joint Sealant for Concrete Maintenance
Concrete joints are the lines cut into the slab, sometimes in a decorative way, to let the concrete crack unnoticeably along these joints.
Concrete moves, shrinks and expands with the seasons, temperatures or adjusting to the surrounding buildings as they move and shift. These joints (often called “expansion joints or control joints”) help the concrete move with these outside forces without causing noticeable cracks.
It's important to seal the joints because this keeps water, ice and dirt from seeping under the concrete pads and freezing – causing potential heaving and sinking. It also keeps ants and bugs from building their homes in these pre-formed “cracks” as well as weeds and other vegetation growing up through.
Materials Needed to Seal the Joints:
• Rubber Gloves
• Old Rags, T-shirts or Socks
• Self-Leveling Sealant - See FAQ’s at the end for more specifics on what product to purchase and how much.
• Scissors
• Caulking Gun
• Optional: Sand – This may be needed for larger expansion joints
• Optional: Clear Dish Soap
• Closed Cell Foam Backer Rod – Optional, but highly recommended for larger wet cut joints or older concrete where the expansion joints have grown bigger with time. Foam backer rod is a nice filler to prevent using a large amount of sealant product. It also serves the function of closing up any gaps and making the area water tight.

Examine the control joints and measure the distance across. The diameter of the foam backer rod should be 1/8 inch larger than the width of the control joint. In addition, measure the linear distance of all the joints you want to fill with backer rod. This will determine how much to purchase. This product can be found at a home improvement store.
If the concrete was saw cut and newly poured, backer rod may not be necessary as the joints will not be very deep and wide.
Materials Needed to Clean Out Old Sealant and Prep the Joints:
• Utility Knife
• Safety Glasses
• Wet/Dry Vacuum
• Optional: Angle Grinder – because the cost is usually cheaper than $100, it may be a nice tool to have on hand.
PREPARATION:
• Wear old clothes and rubber gloves
• Outdoor temperature for best results – between 60 and 80 degrees F, but the sealant product will perform between 40 and 100 degrees F. The surface area of the concrete must be less than 150 degrees. Please store the sealant at room temperature until ready to use.
• Schedule for a time when rain is not forecasted for 24 hours after completion
• The concrete surface and joints must be dry.
Step #1 CLEAN THE JOINTS
Remove old sealant, weeds, ant hills or other things that lodged in the joints of the concrete
(If the concrete is newly poured, skip this step.)
A. Use the utility knife to cut out old sealant or weeds and remove.
Remove weeds from concrete jointsGot ants and weeds in your concrete? Seal up the joints.
Posted by CCConcrete on Wednesday, March 9, 2016
B. Remove any prior foam backer rod or expansion joint.
C. Vacuum up residue from the joints
D. For extra thick sealants, use an angle grinder to remove the excess. Remember to wear safety glasses and gloves! If there's still sealant left after using the angle grinder, you may still proceed. Sealant that adheres after angle grinding won’t interfere with the new sealant’s bonding.
Quickly Remove Sealants from Concrete JointsRemove weeds and old sealants from concrete joints with an angle grinder. Please use safety googles and gloves (unlike us in this video!)
Posted by CCConcrete on Wednesday, March 9, 2016
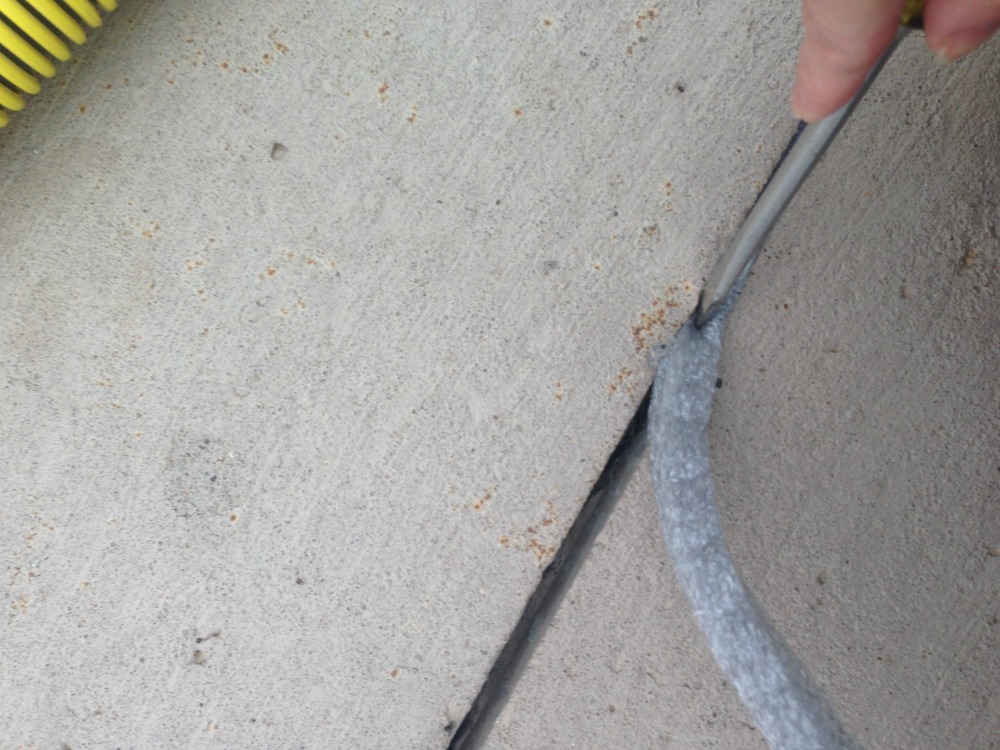
Step #2 PLACE FILLER
A. Place the foam backer rod into the joints. Its depth should be ¼ to ½ inch below the surface of the concrete. It MUST sit beneath the surface of the pads or there'll be humps once the sealant is placed. Snow blowers or shovels could catch on any protruding sealant. If any foam backer rod protrudes, don’t use it. Simply use sealant (step #3) to fill the gap.
B. If the joint is wider than the backer rod you bought, simply twist 2 strands together like a rope before placing.
C. Optional: For large joints, pour a little bit of sand on top to fill in any gaps between the concrete and the backer rod. Make sure there's room to place the sealant so it doesn't rise above the concrete, causing humps.
We placed foam expansion joint (an alternative filler) in the cracks before filling.
Fill Concrete Joints to Save on CaulkFoam Expansion Joint to Fill Concrete Joints before Caulking
Posted by CCConcrete on Wednesday, March 9, 2016
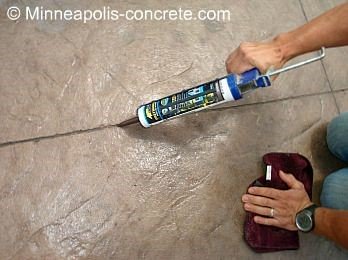
Step #3 PLACE SELF-LEVELING CONCRETE JOINT SEALANT
A. Cut the sealant tube with a scissors to make a ¼ inch bead. Don’t cut the tube larger as this will release too much product.

B. Pierce the seal inside the sealant tube with the point of the scissors blade or the end of a wire hanger if the scissors point is too large.

C. Place the tube in the caulking gun.
D. Gently squeeze the product into the expansion joint. Allow the product to flow and self-level. You may use clear dish soap on your gloved-fingers to smooth out the product, if necessary.
Tip: After completing one joint, evaluate how much product it took to fill. If it took a lot, and you want to conserve sealant, add more sand to the joints before continuing.
Caulking Concrete Control JointsCaulk Concrete Control Joints to Help Protect Your Slab from Water, Ice, Dirt, Weeds and Bugs.
Posted by CCConcrete on Wednesday, March 9, 2016
CURING
• 2-3 hours for the sealant to be tack-free (no longer sticky)
• Fully cured in 3-5 days. The manufacturer reports that it takes one day to cure in 75 degrees F and 50% relative humidity. Expect an extra day of curing for each 10 degrees lower than 75. Avoid driving over it until fully cured.
FAQ
What Self-Leveling Concrete Joint Sealant Should I Use?
Vulkem 116
Several color options are available. To match regular concrete, pick Limestone. Gray will more closely match colored concrete that has been purposely colored grey. Here is the color chart:
Sizes: Standard: 10.1 ounce and Sausage: 20 ounce
The aluminum, dark bronze, black, grey, limestone and white come in 20 ounce sausage containers. This is the most economical and time-saving purchase if using these colors, but a commercial caulk gun is needed.
Concrete joint sealant can be purchased at Cemstone in Eagan MN, Home Depot, Amazon or Ebay.
How Much Self-Leveling Concrete Joint Sealant Do I Need?
Measure how many linear feet of concrete joints you'll fill.
The product coverage is 308 linear feet of joint per gallon for a 1/4" x 1/4" (6 mm x 6 mm) joint – So it will take thirteen 10.1 tubes to fill 308 linear feet of expansion joint ¼” deep and ¼” wide.
How Can I Remove the Concrete Joint Sealant from Unwanted Areas?
First – try to wipe, scrape or cut it off. Any concrete joint sealant still remaining may be removed by wiping with a cloth soaked in xylene, but this powerful solvent will also remove sealer, exposing the concrete. If the concrete is colored, the surface color will lighten if the sealer is removed. Therefore, use the utmost caution in keeping the sealant in only the joints. If xylene must be used, wear gloves and a mask as this is a powerful solvent.
Home > Sealing Concrete > Concrete Joint Sealant
Home > Stamped Concrete Designs > Concrete Joint Sealant

License # BC721668
New! Comments
Have your say about what you just read! Leave me a comment in the box below.